The China Dish journal / A closer look
Four Hand-Building Pottery Ideas to Try Without a Wheel
Choose a pinch-pot ring dish, coiled pencil jar, slab animal mug or freestanding hippo, with ways to plan its shape and build it by hand.
For a first hand-building project, try a pinch-pot ring dish. A single ball of clay gives you the base, walls, and rim, and you can shape the whole thing in your palm. If you’d like to build upward, make a small coiled jar. If you have an animal in mind, decide which part you most want to make. A pig’s snout can turn a plain slab cup into a mug with a face. A hippo resting on four short legs gives you a reason to sculpt the whole animal.
Pinch a ring dish that’s easy to reach into
Picture taking a ring off before washing your hands and reaching for it again while your fingers are still damp. A shallow dish gives you enough room to slip a fingertip under the ring without chasing it around the bottom. That’s a better guide to the opening than the size of the ring alone.
Pinching is one of the simplest hand-building methods. Start with a ball of clay small enough to cradle. Open a hollow with your thumb, leaving clay beneath it for the floor. With your thumb inside and your fingers outside, pinch a short section of wall, turn the pot a little, and pinch the next section. Feel around the wall as you go. If one spot is already thin, turn to a thicker part. Set the dish down occasionally so you can see whether it sits steadily and how far the rim rises above the floor. Ceramic artist Ana Vizurraga demonstrates the basic form for Emory’s Michael C. Carlos Museum.
A second dish makes a useful experiment. Keep about the same amount of clay, but leave the opening narrower and bring the sides a little higher. Seen from above, the two bowls may look much alike. Viewed from the side, it’s easier to tell which one you’d choose for a ring.
Build a coiled jar for a few short pencils
Stand two or three short pencils together on the table and use the space they occupy to estimate how wide the base should be. The shortest pencil gives you a stopping point for the rim, since you’ll want enough wood showing to take hold of it.
For this shape, roll clay into long ropes and build the wall a row at a time on a clay base. Support the outer wall with one hand. With a fingertip inside, smooth the clay across the join as you turn the base. Look across the mouth after each turn. Placing a coil directly over the last one keeps the sides upright. Moving it a little farther out begins to widen the jar. The changing outline is easier to see at table level than from directly overhead.
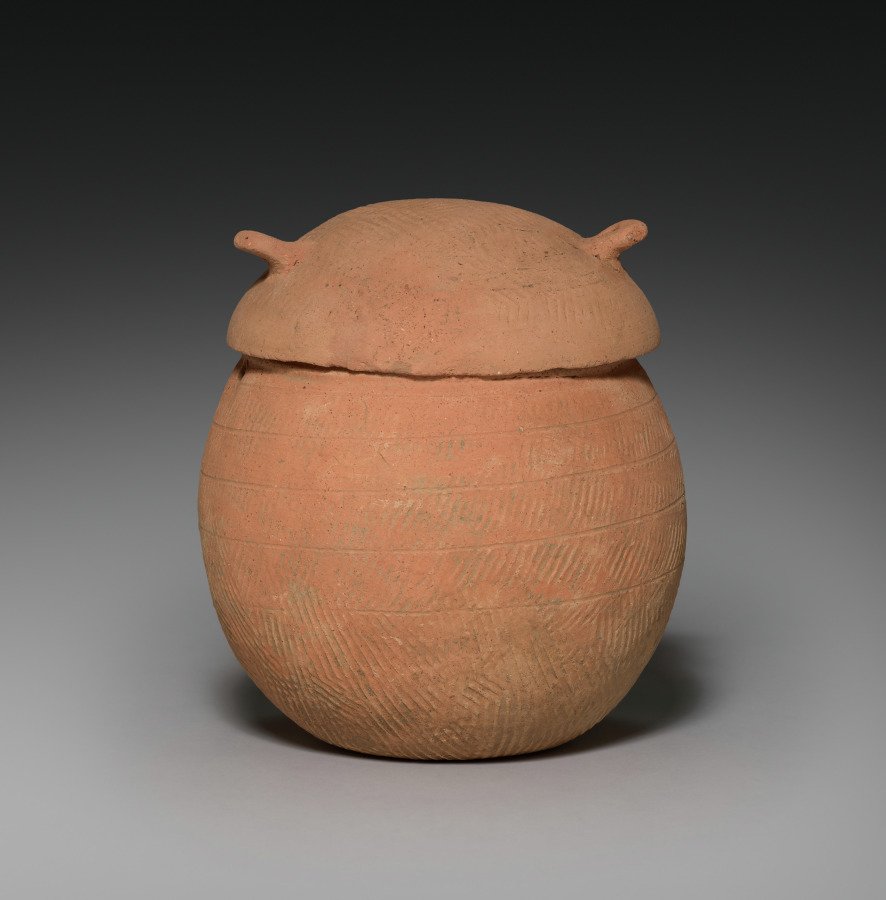
The Cleveland Museum of Art’s Lidded Vessel with Loop Handles, the Korean jar pictured at the top of this page, started with coils of clay. The potter finished the body on a wheel and used a carved wooden paddle to make the ridges you can see across the surface. Four incised lines run around the belly. When you trace its silhouette with your pencil, you’ll find the point where the body stops widening and begins to curve back toward the mouth.
Give a slab mug a pig’s snout or a dog’s ears
A blue dog and a yellow pig appear in Jane Irwin’s fourth-grade mug lesson. Both begin with the same pair of shapes, a rectangle for the wall and a circle for the base. You can try out the proportions before touching the clay. Curl a strip cut from a thin cardboard carton into a cylinder and stand it on the table. Does it look like the little cup you had in mind? Trim the card until it does. Irwin favors small templates because a larger cylinder is harder to keep upright. Jane Irwin’s slab animal mugs
Trace the rectangle on a rolled sheet of clay, or slab. Curve the wall around, join its ends, and attach the circular base. The feel of the slab matters here. Irwin found that a very wet wall slumped, while an overly dry slab cracked when bent. Once the cup stands, give it time to firm up. That pause is a good time to draw a few faces on paper.
For a pig, try a low oval snout with two nostrils. For a dog, sketch two versions with the ears in different positions. Put the drawings side by side and see how little clay you might need to suggest the animal. Irwin treats the handle as optional. If you’re making the shape in air-dry clay, plan to use it for a dry purpose such as holding pencils. For a drinking mug, arrange the clay, glaze, and firing with your ceramics studio before you build.
There’s another place to put an animal on a cylinder. Look below the wall of this Han dynasty jar. Each of its three feet takes the form of a seated bear holding a cub. The jar has molded relief decoration. What you can borrow for a sketch is the placement. Draw a plain cup, first with a face near the lip, then with a small creature crouching at the foot. Notice where your eye goes first.
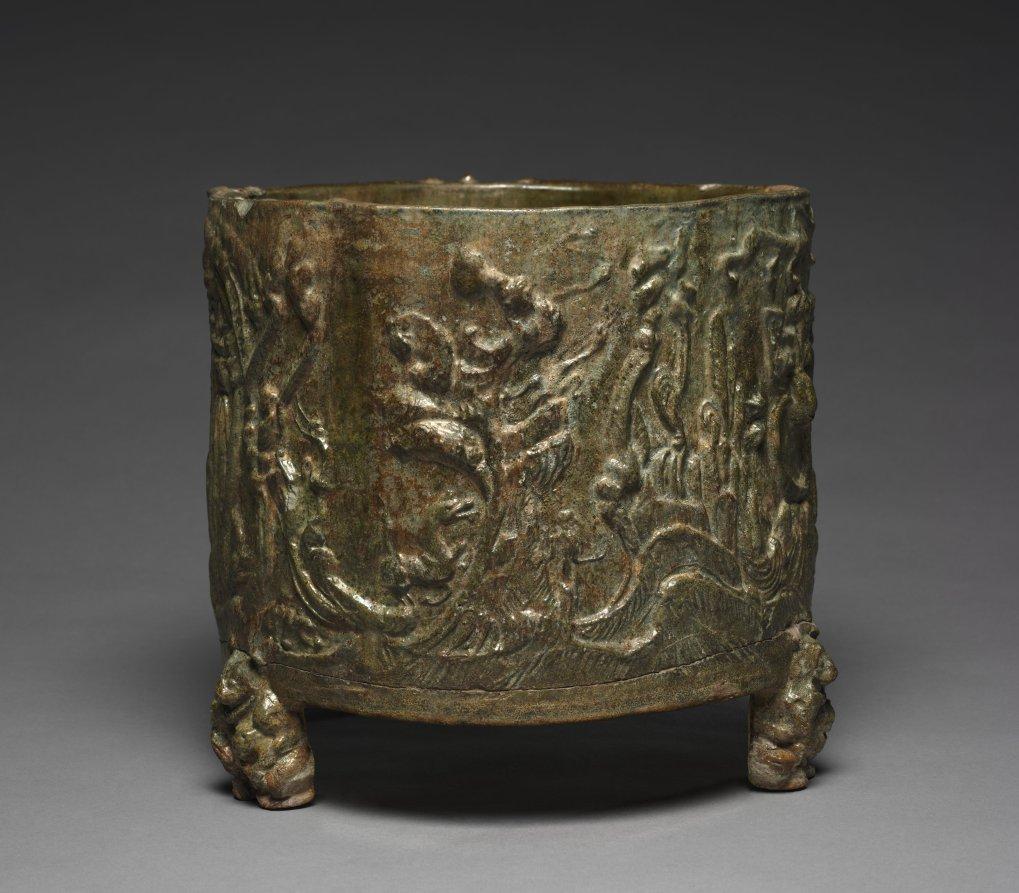
Cylindrical Jar, Han dynasty, 1948.214. Purchase from the J. H. Wade Fund. Image courtesy of the Cleveland Museum of Art, CC0.
Make a freestanding hippo if the whole animal interests you
Irwin also taught beginners to build animals in the round. A clay hippo, pig, and elephant appear among her students’ examples. She began with drawing. The children reduced the body to a large shape, then added smaller shapes for the parts that made their animal recognizable. That exercise is especially helpful if the mug sketch keeps sprouting legs and a tail.
For a hippo, draw the belly low and the legs short. Turn the sketch into clay beginning with the largest shape. Place the body on its supports and look at it from either end before spending time on eyes or nostrils. If the outline still reads clearly without those marks, you’ve already done much of the work. Irwin teaches students to scratch the meeting surfaces and use slip, a liquid mixture of clay and water, to attach smaller pieces. In this project, where the weight rests matters as much as how the face looks.
If you’d like a model for a second drawing, try William, the ancient Egyptian hippopotamus in New York’s Metropolitan Museum of Art. This faience figure has a long, uninterrupted curve from the highest point of the back down to the broad end of the muzzle. Try drawing it in a single pencil stroke before you tackle the little plant patterns that run across his sides.
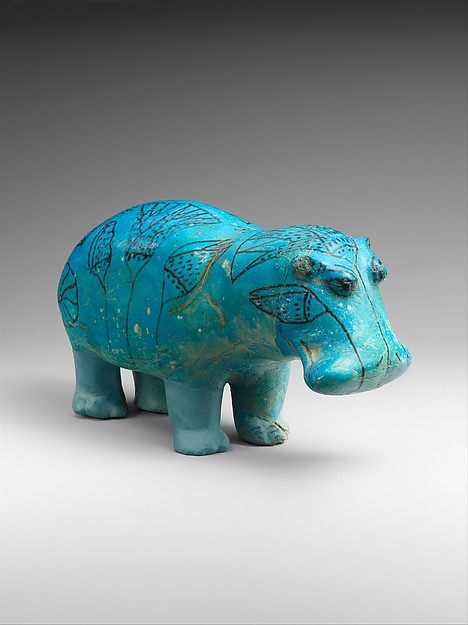
Hippopotamus (“William”), Egyptian faience, 17.9.1. Gift of Edward S. Harkness, 1917. Image courtesy of The Metropolitan Museum of Art, public domain.
If you’re choosing between the two animal projects, draw the same pig twice. In one sketch let its round snout project from a cup. In the other give it a belly, feet, and just enough tail to show when you turn it around. Which drawing makes you want to reach for the clay?